Do bugs bug you? The bad buggers bug me badly! Well…I have a seven prong approach to defeating “pests” in the vegetable garden. The first is to recognize that healthy plants are less prone to both diseases and pest invasions. I am constantly working to improve plant health by feeding weekly or bimonthly, depending on the time I have, with a high quality brewed compost tea and an organic fish fertilizer (Pure Protein,) added every other brew or sprayed separately, that will blow your mind when you see the results. I have been “sold” on the Boogie Brew and Organic Ag Products for several years now because of the amazing results I’ve witnessed, so it is all that I prefer to use both as a foliar feed and root drench!
There are other factors that affect plant health, too. Proper watering is one…which is one of the main reasons Mr. Farmer Brown and I completely converted ALL of our garden beds from in-ground to a self-watering container method of growing called RGGS (Rain Gutter Grow System). Keeping plants spaced well and properly pruned is another key factor for proper air flow. “Sweaty” plants, as I call them, all crammed together and overlapping each other is a breeding ground for problems. Proper sun exposure is, of course, another factor, so placement of the garden is a key first step. Lastly, soil imbalance will create unhealthy plants, so knowing what you are adding to soil and, in our case, making our own potting mix with a balanced PH and adding quality organic amendments that create a lot of microbial activity will make the plants dance!
Finally, we have arrived at Part 5 where I am sharing the layout for each of our four garden beds identifying what and where I plant the vegetables, herbs, and flowers to create a productive garden and hospitable habitat for beneficial insects.
Let’s begin with the overall picture of the garden beds which reside in our front yard!
One of the most important aspects of the companion planting theory is attracting beneficial insects to the garden…and, more importantly, keeping them there. All living beings require food, water and shelter to survive. Aside from the obvious meal (garden pests,) beneficials love the pollen and nectar provided by a diverse array of vegetables, herbs, and flowers.
So, a few points to consider when choosing and placing flowers in the vegetable garden.
Planting herbs is a great addition to the vegetable garden. Besides providing delicious, fresh additions to meals, they are easy to care for, pleasant to look at, and pack a powerful punch as companion plants. Herbs are the easiest plants to intersperse between food plants, in order to increase yields. They are strongly scented to attract beneficial insects thus encouraging pollination and providing shelter for them, or repel and confuse the bad ones.There are dozens and dozens of herbs.
I’ve chosen 16 that will be great additions to your vegetable gardens. Let’s jump right in!
The mere mention of the term “Companion Planting” will make
some agricultural nostrils flare with disdain, as they view it as pure hype,
and some suggested companions out there may very well be. However, you may have
to backtrack a little if you poo poo its effectiveness as an increasingly
number of studies conducted by reputable institutions bear out the viability of
companion planting.
Companion
planting uses both science and art to unite plants in beneficial
combinations. It is a technique based on
a long history of observations of the interaction between plants in the
garden. Certain combinations of plants
can add to, or detract from the abundance and health of edibles in your garden
by:
Altering the soil,
Attracting or repelling insects, or
Creating a helpful microclimate.
Companion planting has been used for centuries. Some plant relationships have been
scientifically proven, others developed by trial and error over hundreds of
years.
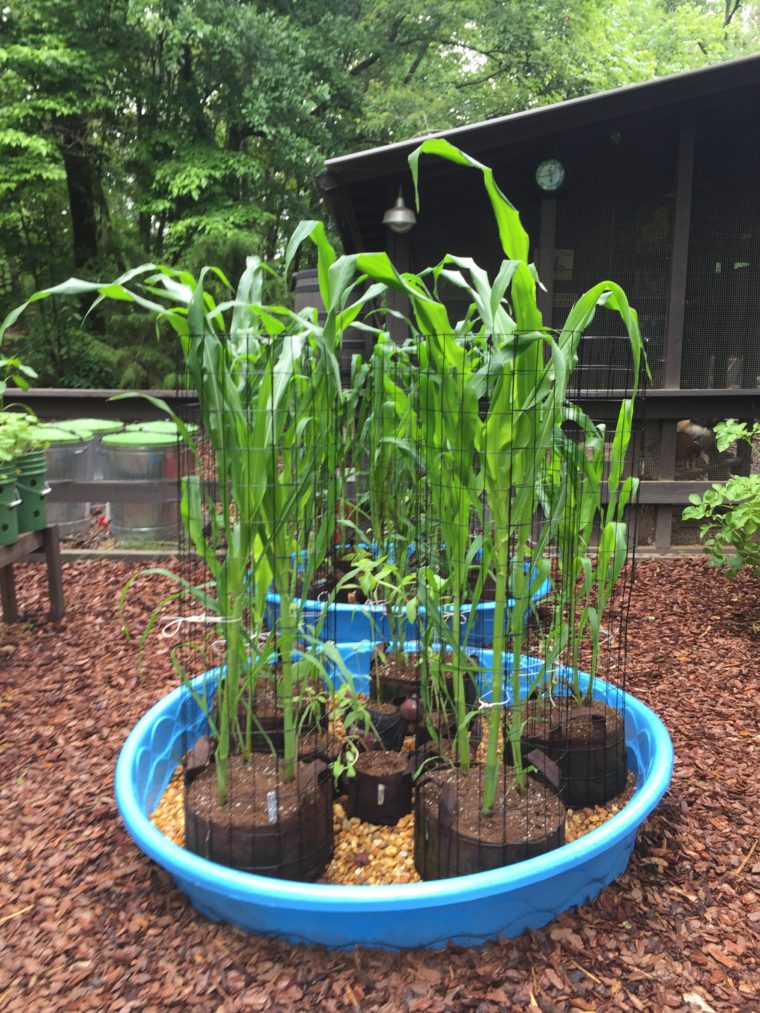
Hey Gardeners! Here is the latest video on setting up a simple sub irrigation planter, without all of the extra rigamarole of typical SIP’s, using a kiddie pool and grow bags. In Part 1 of the four part series, we level the pool, discuss materials, and demonstrate how to set up a simple float assembly for automated watering. Part 2 covers how to fill up the bags, and show how to use multiple size grow bags in the same pool. Part 3 shows how to plant corn in this system of growing and how to keep your plants erect from high winds. The last part will be a few weeks down the road as we show growth, cover any problems that might arise and how we dealt with them. We will also show the pretty simple build for keeping varmits out of the corn!
Please feel free to ask questions. I will do my best to answer as quickly as possible. We’d love to have you join our FaceBook group; you can find the link at the top or bottom of the blog. Please consider subscribing to our YouTube channel, as well. Thanks!
I hope you find the video series useful and get a good laugh in, too!
This marks year three and the fifth growing season for using the Rain Gutter and Kiddie Pool Grow Systems (RGGS and KPGS,) for all of our vegetable growing. Over this time, I have worked on perfecting the steps I follow for continued success. I should note here that the first season, we followed Larry’s recipe mix and instructions on filling the buckets and bags to the letter with very good production. In season two, I began tinkering a bit with the recipe adding in amendments that I had previously used for years when planting in-ground and felt would be beneficial.
Here is an intro video of this method of growing on our YouTube channel:
Being a member of Larry Hall’s RGGS facebook group has been invaluable; learning from both the file documents and loads of very educated gardeners using the system. A very special shout out to Bud Enderingham who is THE gardening guru and a good friend! Every year, the ‘newbies’ naturally have sooooo many questions. Often times, these queries make the “old timers” think and explain in greater detail as to the how’s and why’s.
I suppose it’s the retired school teacher in me that enjoys/requires clear directions that are simple to read and understand with brief explanations given only when needed. I decided to synthesize my copious notes into one document in the hopes that it will help someone. I’m only covering the mix, the containers, and the filling process in this article. Turning all of my notes from my gardening notebook would become a BOOK!
Here are some tips and the steps I follow…
Larry’s Potting Mix Recipe
This recipe makes 15 gallons and fills 3 five-gallon buckets or grow bags. If you only are mixing a gallon or two, it is just a little division to do. Honestly here, challenging your brain to think is a good thing. Your brain cells are in a constant state of either dying or growing. Growing seems to be the better option; afterall, you are trying to ‘grow’ food, right? Just a thought from the forever teacher in me!
2 five gallon pails of sphagnum peat
1 five gallon pail of compost
12 cups perlite
Here comes the pause as I talk about the lime and Epsom salts as this issue/question comes up EVERY year…
DO NOT USE PELLETIZED LIME! It must be PULVERIZED. Pelletized lime takes a very long time to break up and adjust the pH of the acidic peat moss. Additionally, the measurement of pelletized will be way off verses the ground lime.
Depending upon which lime I use, I adjust the amounts of Epsom salt added to the mix. The reason? The two different types of lime contain very differing amounts of magnesium. Epsom salt is added because it also adds magnesium and some sulfer. Too much magnesium can lock up the plant from taking in what it needs to thrive. So….
1 1/2 Cups dolomitic garden lime use 3/4 Cup Epsom salt
or
1 1/2 Cups agricultural lime use 1 1/2 Cups Epsom salt
That is the basic recipe. It is strongly recommended that you stick with just the basic mix for the first growing season. Take notes; keep a gardening journal, and then consider if you want to go the extra expense, energy, and time to add amendments. Having said that, here is what I additionally add to each batch now:
1/2-3/4 Cup Azomite (mineral rock dust)
2 Cups Worm Castings
1 generous handful of 10-10-10 or 2 handfuls of organic 5-5-5 fertilizer
(Note: Adding fertilizer to the mix is only because I now use method #2 below for filling the buckets/bags which gives the pellets time to soften and get incorporated before the plant is transplanted. Otherwise, planting immediately or within even a day could burn the roots if they come in contact with any undissolved fertilizer. The purpose of the added fertilizer in the mix is to give the plants a boost; it is not to replace the ring of fertilizer described at the end of this article.)
Plant Specific Changes to the Mix:
Large indeterminate tomatoes, corn, and strawberries get an extra 2- 2.5 gallons of compost added in the mix recipe.
NOW…for the exceptions on the mix!
You do NOT want to add any lime to the following herbs/vegetables as they prefer a more acidic soil: blackberries, blueberries (more on these below,) potatoes, raspberries, sorel, sweet potatoes.
Add up to 1/4 the amount of lime, or none at all, for these herbs/vegetables: basil, eggplant, sage, strawberries.
Blueberries: I have a completely different mix altogether for our blueberries planted in 20 gallon grow bags. You can find that recipe on my blog post titled, Building A Modified KPGS.
Recipe for Years 2 and 3 Using Reclaimed Mix
Can you reuse your mix? Simple answer is yes with some caveats! Mr. Farmer Brown and I built a reclamation box to hold this used mix which works beautifully for us. When reusing the mix, the first thing we do is discard the top 2″ from the bags/buckets. This is to ensure that we are removing any spores, larvae, eggs, etc. that may have made a home there! Then we dump it in the box and remove the roots. The reclaimed mix recipe is as follows:
1 five gallon pail of sphagnum peat
1 five gallon pail of reclaimed mix
1 five gallon pail of compost
12 cups perlite
Cut whichever lime you are using by about 1/3
Use same amount of Epsom salt
Add any additional amendments that you desire
The reason to reduce the garden lime is that it just has to lower the PH of the one fresh pail of peat as opposed to two pails of fresh peat in the original mix.
After the third year, your mix is not viable for use in the containers. Peat is an organic material that deteriorates some each year. By the end of year 3, it is no longer peat but mostly just organic material just as if it had been in a compost pile and this medium will no longer wick. You can’t use it as a replacement for the compost either, because many of the nutrients from its decomposing have been consumed. It is great to add it to an existing compost pile along with the other green and brown matter you normally add. We either add it into landscape beds, our fruit tree guilds, or give it to our compost makers: the chickenistas!
Note: If you have been adding worms into your containers, the castings will help your plants, but the worms also feed on the peat. So, a second year use of mix that has had the worms is sorely lacking residual peat. Adjust for that in using your reclaimed mix.
——————————————————————————————————————–
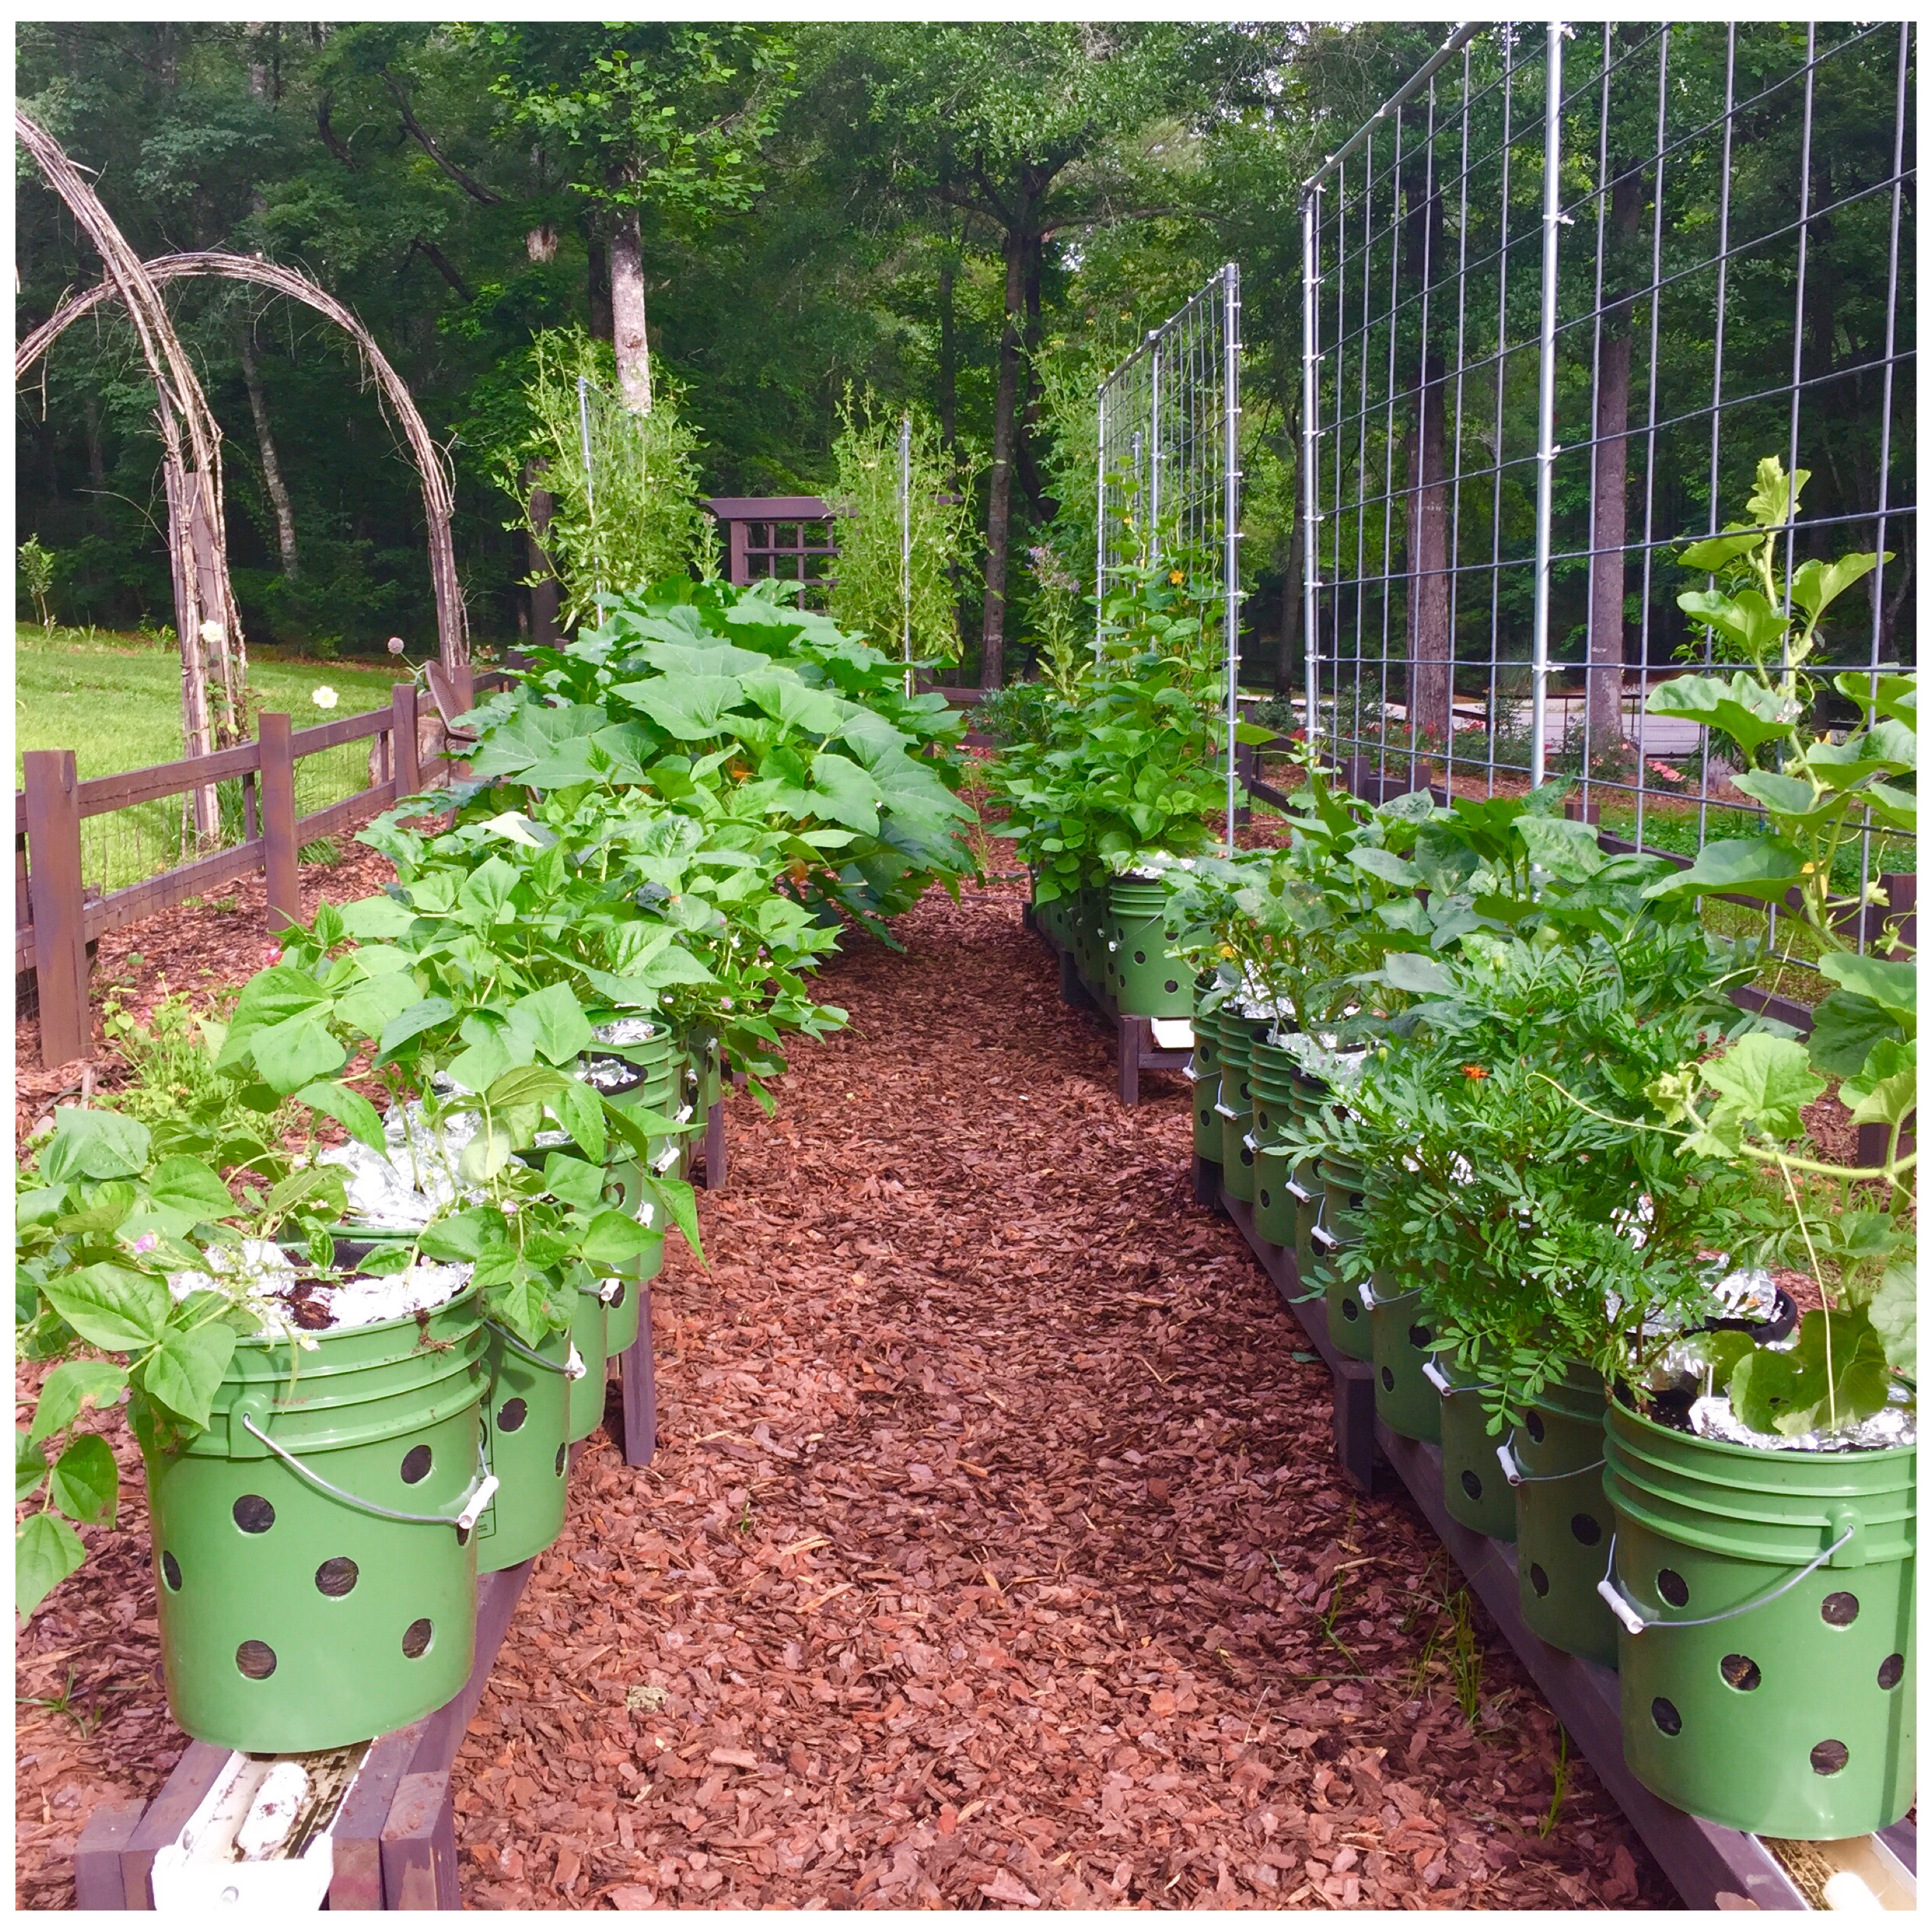
Containers
Choice of containers: grow bags verses buckets is entirely up to you. I prefer buckets on rails (AKA: gutters) for the aesthetics as the majority of our set-up is in our front yard on our mini-homestead. I do, however use grow bags in two pools for corn. Corn is one exception that planted circularly in a pool helps dramatically with pollination. A note here, you can use grow bags on a rail, but it has to be supported and a net cup incorporated or it will sag over the edges of the gutter, drip water and stop the wicking action. Even when just setting the bag on a wider frame, the wood can draw water from the bag. There are several ways to fix the issue. One way is to use a bucket lid to hold the netcup and to support the bag. Others have used laundry baskets or milk crates with holes instead of the bucket lid. In any of the above supports you use, you don’t have to cut the bag for the netcup, but cut the hole in the lid or basket, then follow the filling instructions listed in the next section.
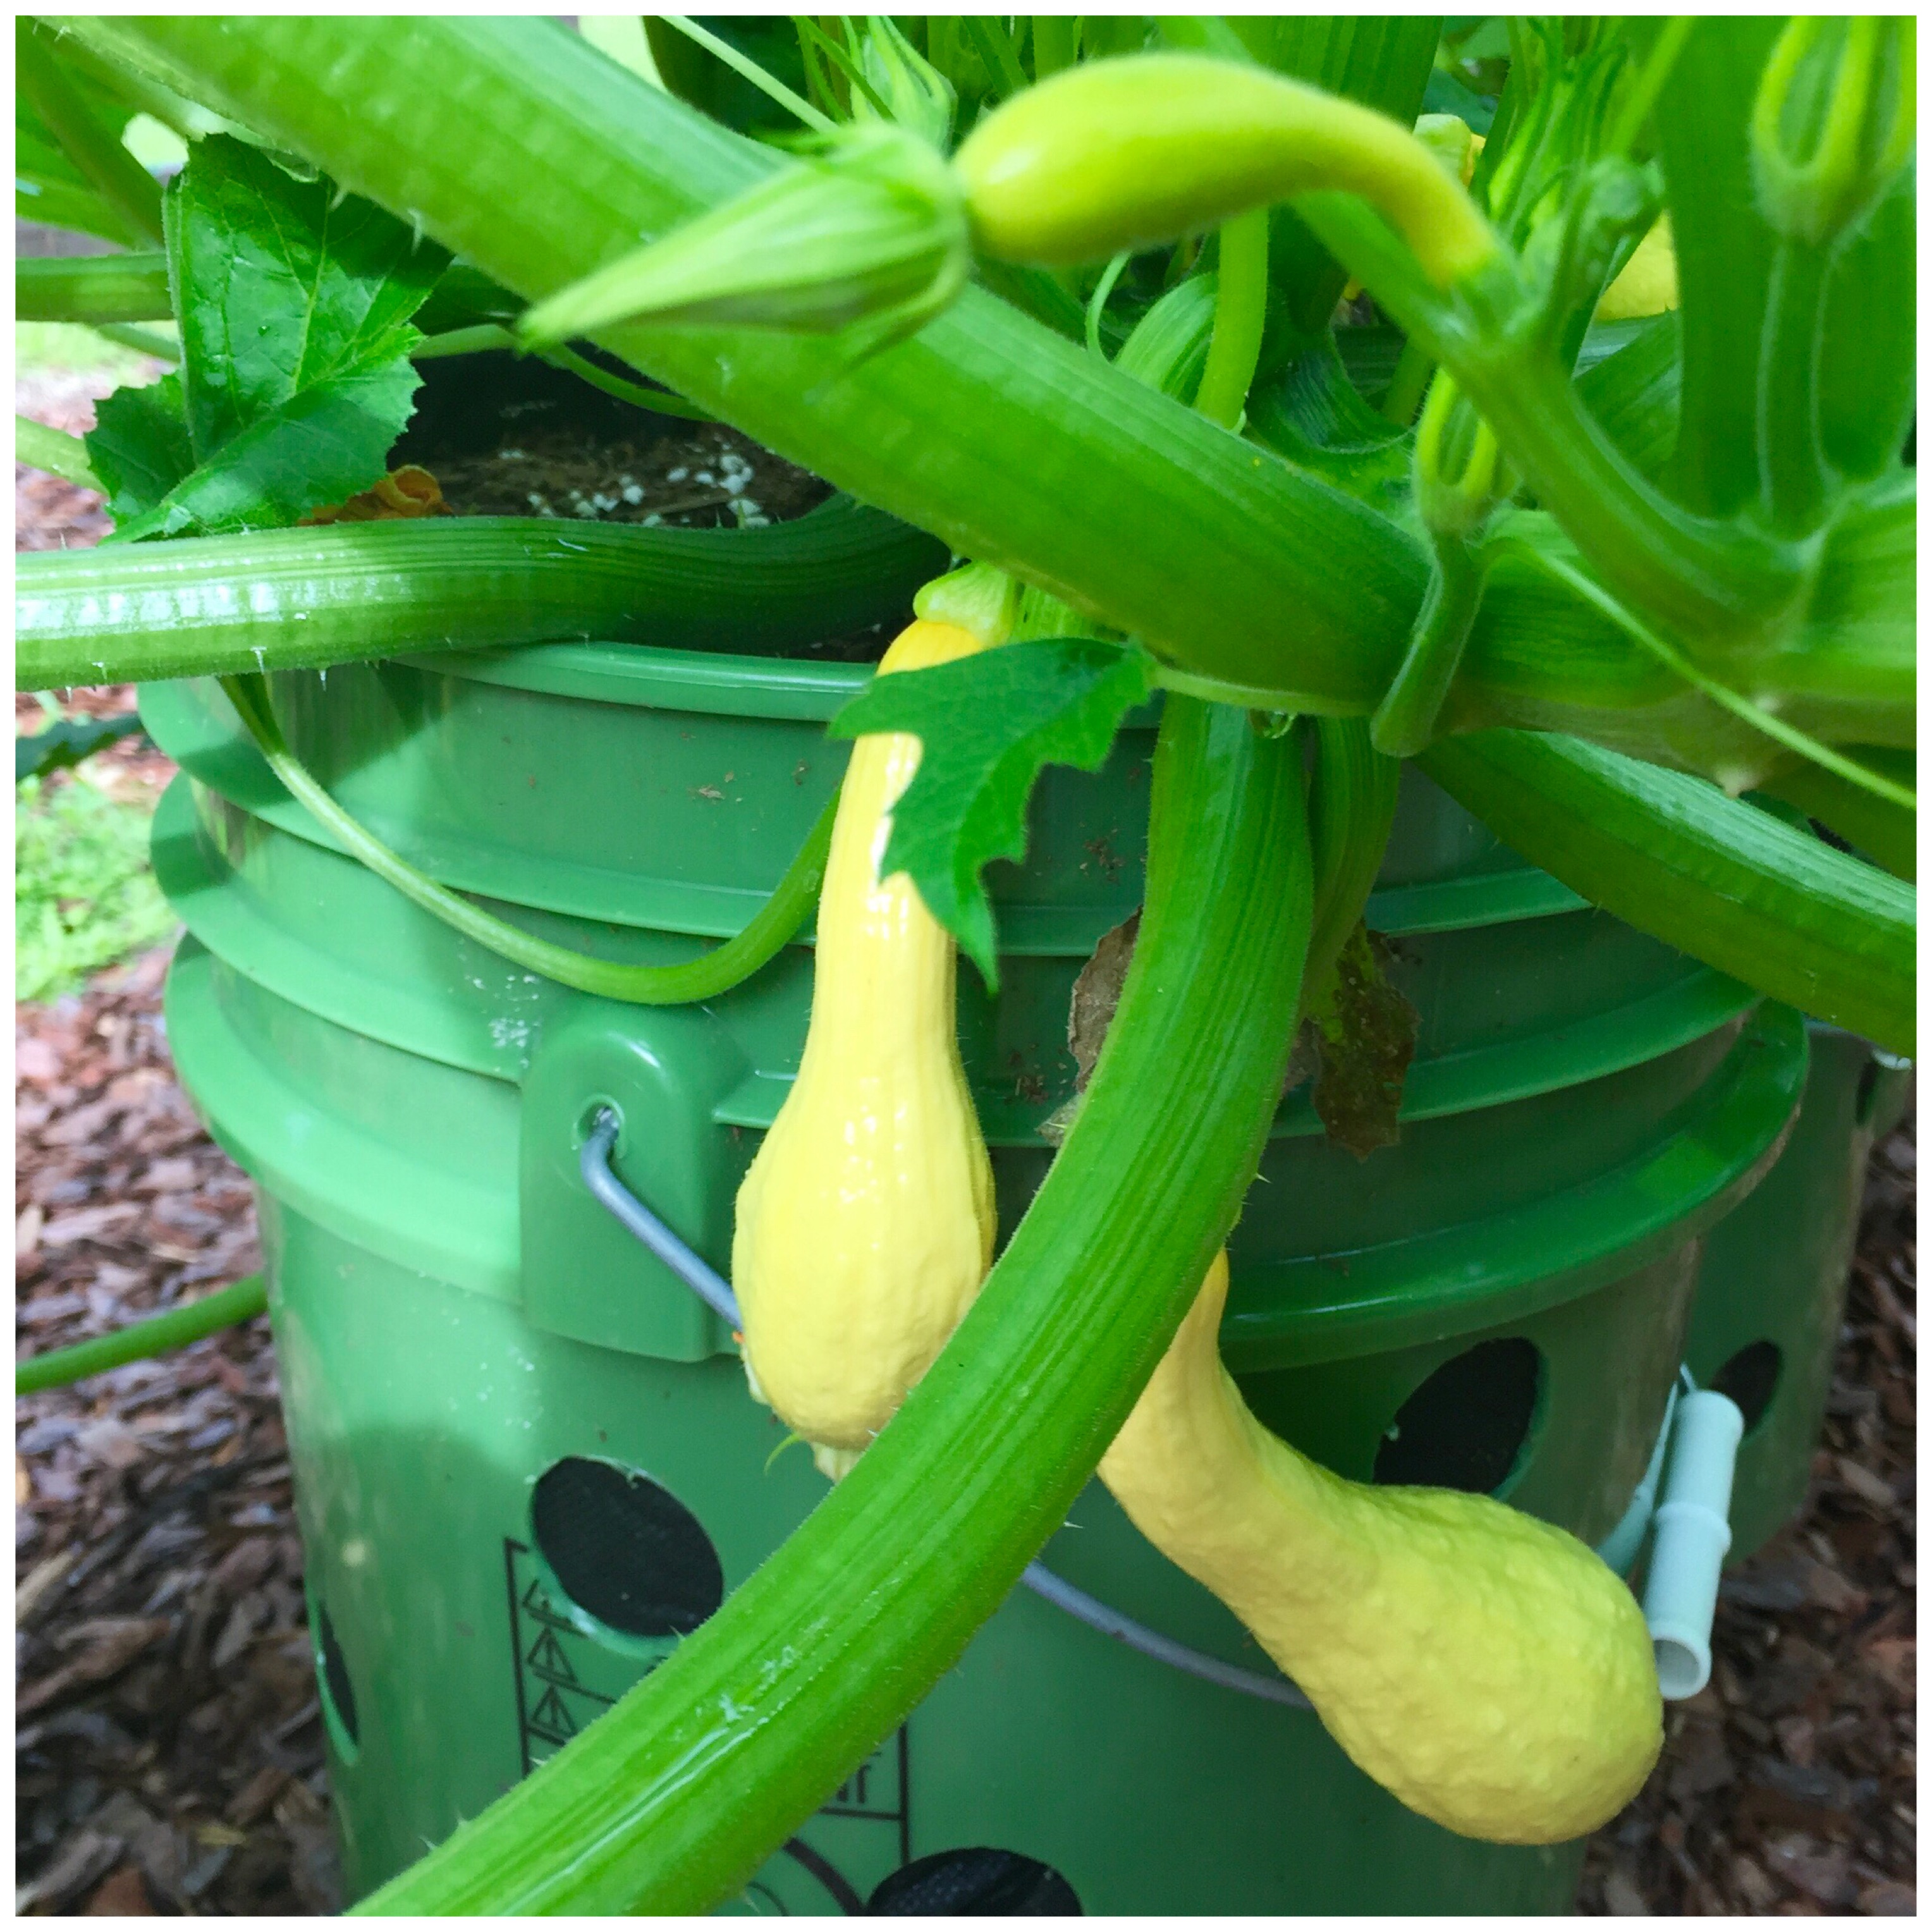
The grow bags naturally have an air pruning feature due to the material from which they are made. Hard plastic, food grade, buckets do not. Therefore, you have additional work to prep your buckets to be air-pruning containers, plusyou have to drill a hole in the bottom of the bucket to insert a net cup. The net cup sits down in the gutter full of water and serves as the “wick” for the plants’ roots. The air pruning holes are accomplished by drilling holes in the sides of the buckets. We prefer to use a titanium step bit for this step. It is much faster! You can find them on Amazon for $9 or Harbor Freight for a bit cheaper than that. The step bit is 1 3/8″ diameter so we just drill more holes. Here is a quick video of Mr. Farmer Brown as the “bucket zombie!” Lol
Why is air pruning important? There are numerous articles out there explaining the concept. Larry has a video devoted just to that topic on his YouTube channel and I demonstrate it as well in the first part of our video titled, Line The Bucket, that is part of our YouTube channel RGGS playlist.
Root Crops are the vegetables I definitely prefer to grow in buckets on rails. Although others have said they have success using grow bags, I have not, with the exception of radishes and the short carrot varieties. For all root crops, I use buckets. The air pruning holes are very different though. We only drill these holes around the sides up 3″ from the bottom perimeter. These holes are really to help the saturated mix that is always in the bottom 4″ of a bag or bucket from being overly soggy and not for air pruning the roots. In this case, obviously, the roots are the edible part of the plant.
————————————————————————————————————————
Filling The Containers
There are two ways to fill bags and buckets for all vegetables except the root crops. For those, there is only one recommended method which is described in method #2. (I will note here that after experimenting this last growing season with filling all containers with method #2, as Bud suggested, I find it much easier and effective for me. There is one exception, brassicas prefer a very firm soil planted a little deeper: up to the first set of leaves. Planting this way, they will form nice, tight heads and bushy vs. tall and leggy plants.)
Whether using method 1 or 2, the first steps are the same.
Put some of your mix in a bucket and get it good and saturated with water. Add 2 inches of sloppy wet mix to the bottom of a grow bag. In a bucket you, first line the bucket with landscape fabric, (I use clothes pins to hold it in place until it is filled,) add the sloppy wet mix to the net cup mounding it like an ice cream cone, then add the 2 inches of sloppy wet mix on top of that. Line your net cup with either: an 8″ piece of landscape fabric, or dropped in a section of panty hose and knotted above cutting off the excess to use for additional net cups, or an 8″ square piece of a Walmart bag. (The choices here are given according to how easily the roots will penetrate into the gutter based on most to least. The only danger to the roots in a gutter are the potential for them tangling around the float and causing it to malfunction.)
Method #1
Mix the batch of potting mix dry, as you normally would. (Please wear a mask!)
Fill the bag/bucket with the sloppy wet mix as described in the paragraph above.
Add the dry mix up to 1/3 of the container and water it in until you see water running out the bottom of the bag or net cup.
Repeat adding another 1/3 and water, the last 1/3 and water until you have reached the top.
Method #2
Mix the batch of potting mix dry, as you normally would. (Please wear a mask!)
Fill the bag/bucket with the sloppy wet mix as described in the paragraph above.
Dampen your dry mix until it has the dampness consistency of a freshly opened bag of potting mix.
Fill the bag/bucket up completely over the 2 inches of sloppy wet mix you have already added.
Give the container a couple of shakes/bumps to settle the mix a bit and fill again to 1″ below the top.
Place filled bags in your pools and buckets on your gutters that have the proper water levels already there.
Do not water at all. Allow 2-3 days for the wicking action to have “done its ‘thang!”
Push your finger down in the mix to check if it has wicked. The top should be dry, but finger depth down, you should feel it damp. Not soggy wet…just damp.
If your finger test is good, plant away. If it isn’t, you did some step incorrectly and need to start over. (I’ve never had it not wick!)
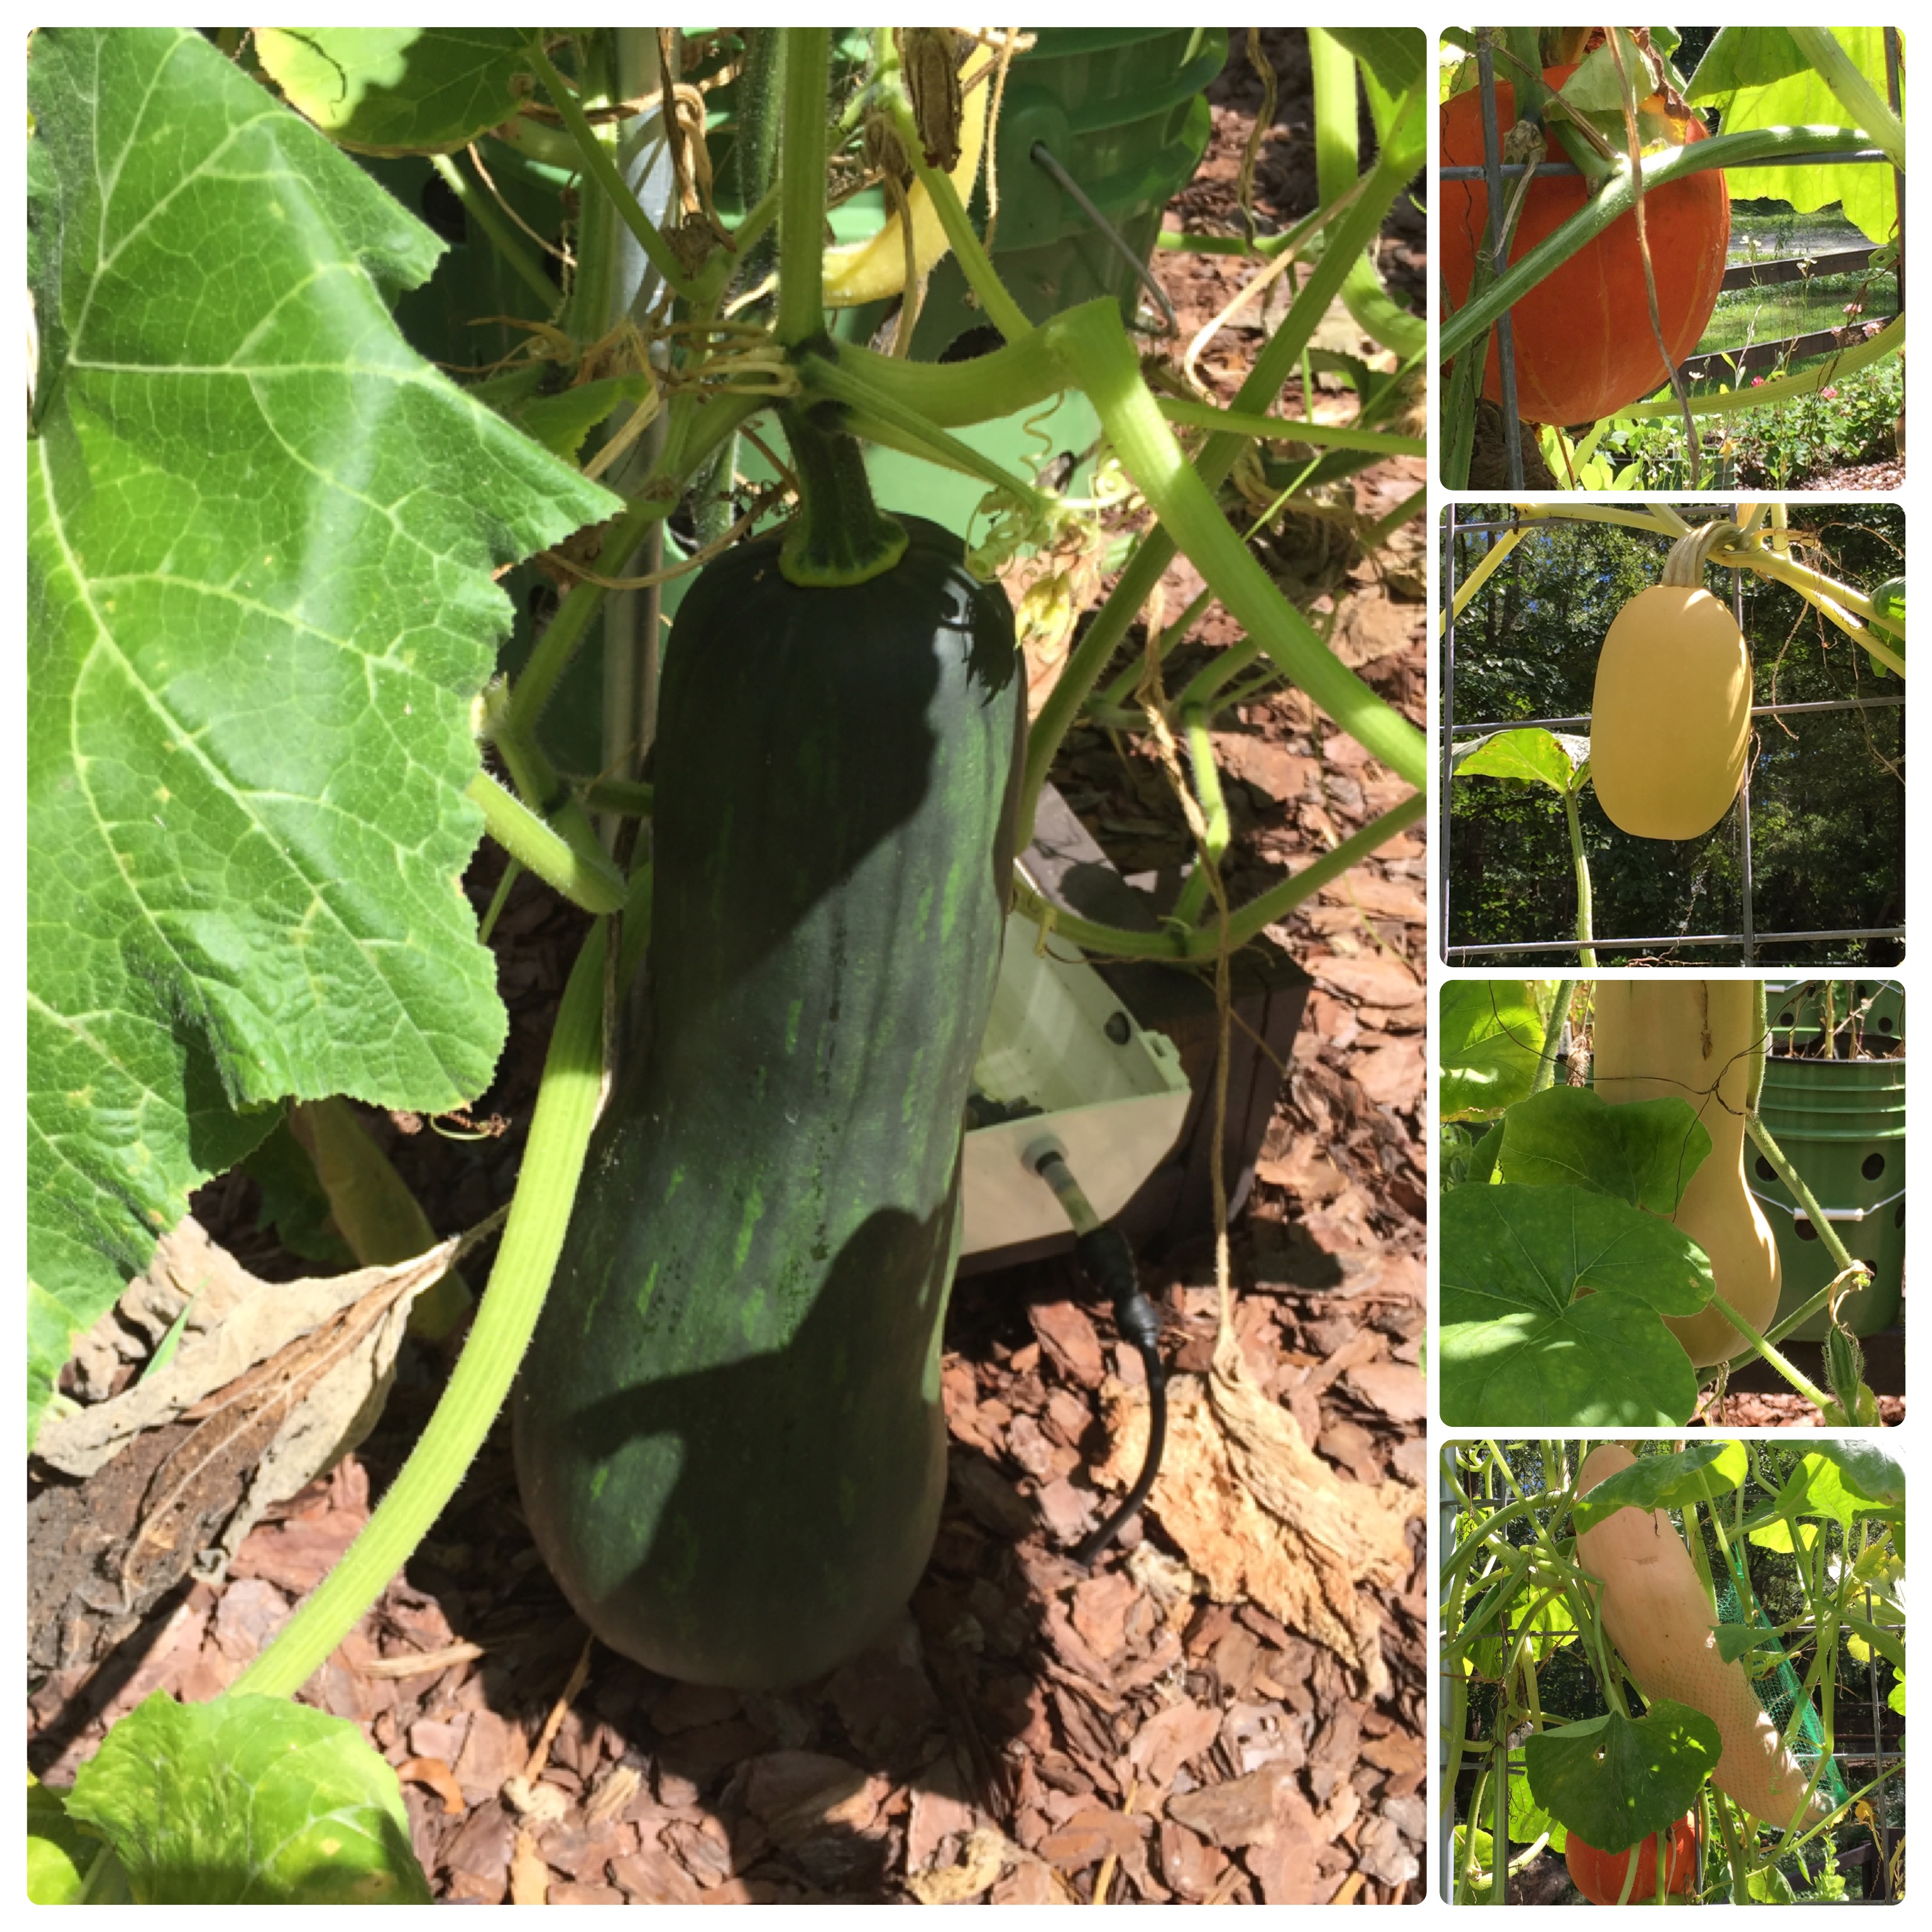
Note: With either method of filling, you should wait a couple of weeks for the plant’s roots to get established, then add a ring of fertilizer for all of the heavy feeders. The recommendation is 1 Cup of a 10-10-10 fertilizer, or 2 Cups of an organic 5-5-5. You add this “ring” to the outer edge of the container making sure to keep it away from the tender plant, and cover it with an inch of dry mix. You do not water this in; you let the rain do that. The heavy feeders are: all melons, corn, cucumbers, eggplant, pumpkins, peppers, all winter and summer squash, tomatillos, and tomatoes. While not necessary, cabbage will benefit from the ring of fertilizer at half the suggested amount.
This last method of filling the containers gives you a light, fluffy, non-compressed mix! That is exactly what root crops need. They can expand and grow downward without restriction from a compressed mix. Have you ever seen root crops growing upward out of the soil? Well, they are going to grow somewhere…if the mix below is too compressed, they will push upwards. As I mentioned previously, I now use this second method for filling everything. It is simpler. I don’t have to drag hoses all over the place from container to container. Most all plants benefit from a light, fluffy potting medium in which to grow. Additionally, I can give all of the plants an initial boost with the couple of handfuls of fertilizer added to the mix. Waiting the 2 or 3 days is no problem as that tends to happen anyway because we like to fill all of the pails first for whichever crop I am ready to plant. For example, our tomatoes will be the first to be transplanted outside later this spring and since we add extra compost and Epsom salt to each batch for tomatoes, it helps us keep the recipe straight by doing all the buckets for them at one time. They will fill 4 gutters, so all of the gutters will be prepped and ready to go prior to planting anything!
for you visual learners, here is a video showing you the two methods for filling the containers; the demo is using buckets, but it is the same for filling bags just minus the use of a net cup.
I guess that wraps it up for the basics on making the potting mix, info on containers, and how to fill them! Good luck in your gardening endeavors… and remember… “Have a good ‘en!”
Do you love blueberries? Are they growing well for you? Well, I do and they weren’t! So, it was time to make a drastic change. Even though we had followed the planting guidelines for growing blueberries in our dreadful hard clay soils, they just weren’t thriving. This 4 part video series shows exactly what we did every step of the way.
Part 3 shows the recipe I used to create an acidic potting mix that the blueberries will love. For your quick reference, here is the mix for whatever size grow bag/container you have.
It’s time to start your seeds! There are so many different methods out there and competing advice on all of it. Over the years, I’ve incorporated, what I feel, to be the optimum steps to follow for successful germination and healthy plants. Below are all of the steps I follow. These things are also covered in a new video; here is that link.
Step 1:
Choosing Seeds – Do your due diligence and choose varieties that grow well in your region. There are so many sources out there from just knowing your growing zone, reading regional gardening books and magazines, to talking to local gardeners/nurseries all the way up to your county AG extension agency/website. Local resources also suggest varieties that are resistant to plant diseases and viruses that are most common in your region. This step will save you time and heartache.
Step 2:
Storing Seeds – Store your seeds effectively. Proper seed storage conditions are below 40°F with less than 10% humidity, tucked inside airtight containers in a dark environment. Some keep theirs in the freezer. I do not; I store my seeds in an extra refrigerator we have in our basement.
Step 3:
Prepping Seeds – Seeds need light, water, and oxygen to germinate. Most gardeners remember the light and water part of the germination equation, but overlook the seed’s need for oxygen. Old seeds, seeds with particularly hard coats, or those vegetable seeds, like peppers and eggplant, that are particularly harder to germinate are more likely to come up short on the ability to absorb oxygen. This negatively impacts germination rates and your garden success.